PAS recommends all Alcovisor breath alcohol testing units be calibrated annually or whenever an accuracy check shows that BAC readings are no longer within tolerance limits.
Because precise calibration is crucial, it can be performed only by PAS Systems International or by persons who have been properly trained for alcohol detector calibration. Some testing programs only allow certain qualified operators to perform calibration and accuracy checks. Make sure you are qualified to perform this function under the rules of your program before conducting calibration.
- Calibration must be performed using a NHTSA-approved wet bath simulator or certified dry gas standard (PAS recommends a 0.080% dry gas concentration)
- When using dry gas for calibration, at or above an altitude of 500 feet above sea-level, an altitude correction must be made
High Altitude Correction Chart
| Elevation from Sea Level | Correction Factor | Corrected Value for 0.080% Dry Gas |
| 0 | 1 | 0.080 |
| 500 | 0.981 | 0.078 |
| 1000 | 0.962 | 0.077 |
| 1500 | 0.943 | 0.075 |
| 2000 | 0.925 | 0.074 |
| 2500 | 0.907 | 0.073 |
| 3000 | 0.889 | 0.071 |
| 3500 | 0.872 | 0.070 |
| 4000 | 0.854 | 0.068 |
| 4500 | 0.837 | 0.067 |
| 5000 | 0.820 | 0.066 |
| 5500 | 0.804 | 0.064 |
| 6000 | 0.787 | 0.063 |
| 6500 | 0.771 | 0.062 |
| 7000 | 0.755 | 0.060 |
| 7500 | 0.740 | 0.059 |
| 8000 | 0.724 | 0.058 |
Calibrations must be followed by an Accuracy Check to ensure the calibration was done correctly and the instrument will provide accurate BrAC readings. Accuracy Checks/Calibration Checks are not the same thing as Calibration. Please refer to the Accuracy Check Tutorial for instructions on properly conducted a check on your device
Alcovisor MARK V Calibration
- Select the Settings Icon and select “Cal.”. Calibration can also be accessed under Advanced Settings.
- Enter the password. Please refer to the Advanced Settings manual for password.
- Enter the concentration of the calibration solution/cylinder. Accuracy should be to one decimal place. The preset unit is mg/100mL. For example, enter 80.0 for 0.080% or enter 100.0 for a 0.100% solution.
Note: Remember to use the High-Altitude Correction Chart to adjust for altitude if needed based on your elevation.
| Mg/100mL | % | % & g/L |
| 20.0 | 0.02 | 0.20 |
| 50.0 | 0.05 | 0.50 |
| 80.0 | 0.080 | 0.80 |
| 100.0 | 0.10 | 1.00 |
| 150.0 | 0.15 | 1.50 |

- Select the right arrow icon to confirm.
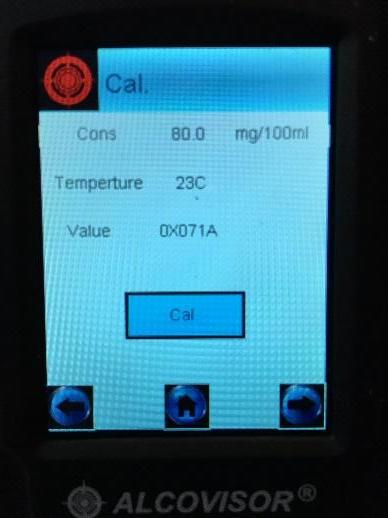
4. The first line shown is the concentration of the calibration solution/cylinder. The second line is the temperature (22 to 28 C). The third line is the calibrated value (to be tested).
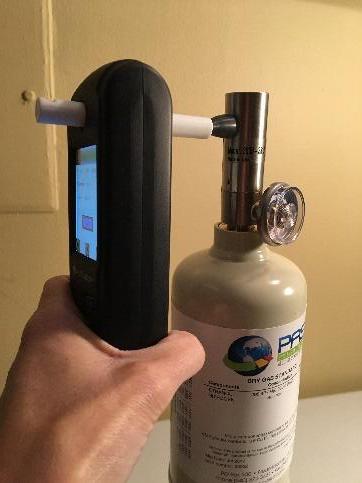
5. Place a new mouthpiece in the MARK V and Connect the MARK V to the cylinder.
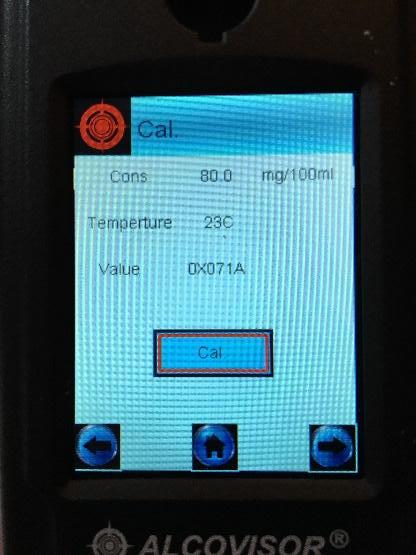
6. Highlight “Cal.” on the screen using the left (red) button.
7. Press the gas regulator button, allowing gas to flow into the mouthpiece for 8-10 seconds. While still pressing on the gas, press the right (green) button to acquire a sample. The gas MUST be flowing into the mouthpiece while the sample is taken. Once you hear the pump click, indicating the sample has been taken, you can release your finger from the gas and remove the device from the regulator.
8. A “Wait” screen will briefly flash and then the Calibration screen will display. The calibrated value in the third line will be changed (this value is a mixture of letters and numbers).
9. Select right arrow icon to finish calibration.
Note: The screen will not change but the calibration will be internally confirmed.
10. Return to the Main Menu and perform an accuracy check to verify the calibration results. For instructions on performing an accuracy check, please see the Accuracy Check tutorial instructions on performing an accuracy check, please see the Accuracy Check tutorial.
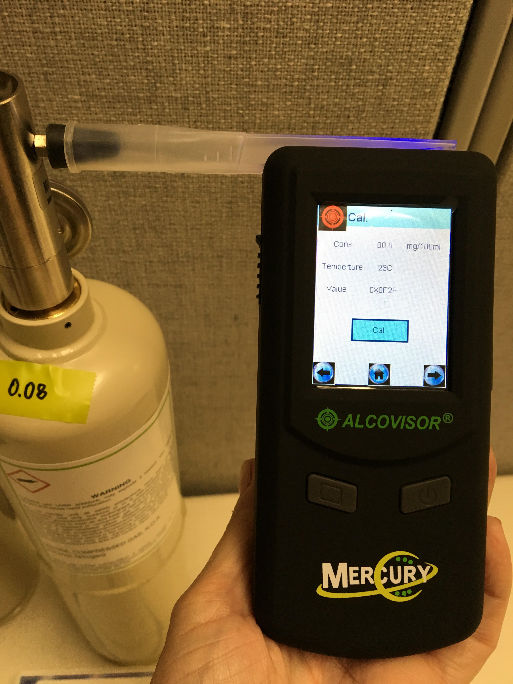
Alcovisor Mercury Calibration ending in Serial Numbers prior to 10400666
- Select the Settings Icon and select “Cal.”.
- Enter the password. Please refer to the Advanced Settings manual for password.
- Enter the concentration of the calibration solution/cylinder. Accuracy should be to one decimal place. The preset unit is mg/100mL. For example, enter 80.0 for 0.080% or enter 100.0 for a 0.100% solution. Note: Remember to use the High-Altitude Correction Chart to adjust for altitude if needed based on your elevation. More examples are in the following table:
| Mg/100mL | % | % & g/L |
| 20.0 | 0.02 | 0.20 |
| 50.0 | 0.05 | 0.50 |
| 80.0 | 0.080 | 0.80 |
| 100.0 | 0.10 | 1.00 |
| 150.0 | 0.15 | 1.50 |
4. Select to confirm.
5. The next screen to appear is the calibration screen. The first line shown is the concentration of the calibration solution/cylinder. The second line is the temperature (22 to 28 C). The third line is the calibrated value (to be tested).
6. Place a new mouthpiece on the Mercury and Connect the Mercury to the cylinder. Note: Firmly press down on the mouthpiece to make sure the mouthpiece is securely attached to the Mercury.
7. Press the gas regulator button, allowing gas to flow into the mouthpiece for 8-10 seconds. While still pressing on the gas, press the Cal. button to acquire a sample. The gas MUST be flowing into the mouthpiece while the sample is taken. Once you hear the pump click, indicating the sample has been taken, you can release your finger from the gas and remove the device from the regulator.
8. A “Wait” screen will briefly flash and then the Calibration screen will display. The calibrated value in the third line will be changed (this value is a mixture of letters and numbers).
9. Select right arrow to confirm.
Note: The screen will not change but the calibration will be internally confirmed.
10. Return to the Main Menu and perform an accuracy check to verify the calibration results. For instructions on performing an accuracy check, please see the Accuracy Check tutorial
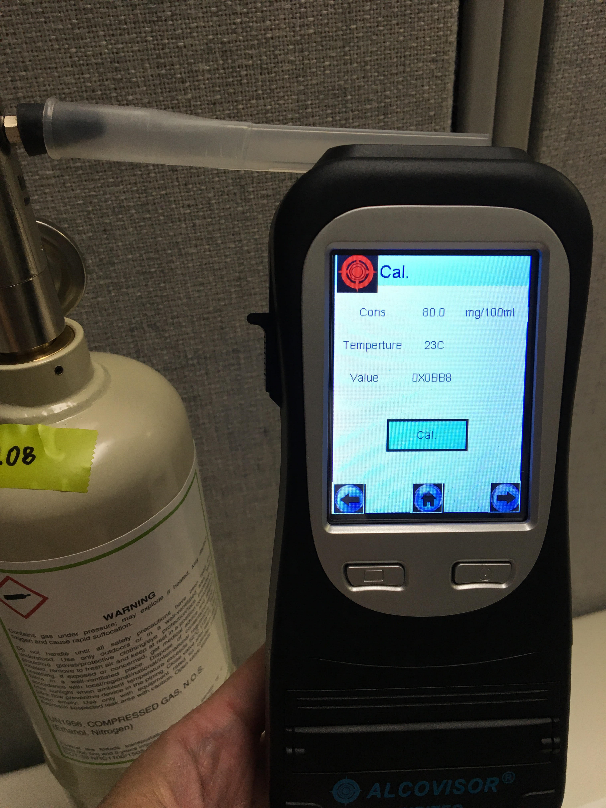
Alcovisor Mercury Calibration ending in Serial Numbers 10400666 or higher
1. Select the Settings Icon and select “Cal.”.
2. Enter the password. Please refer to the Advanced Settings manual for password.
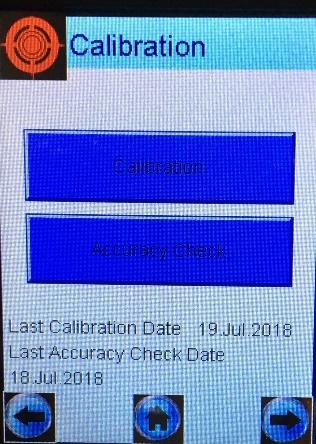
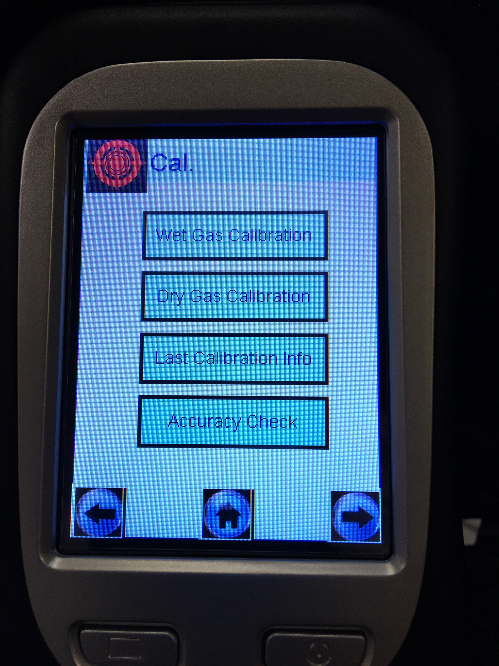
3. Select Calibration
4. Enter the concentration of the calibration solution/cylinder. Accuracy should be to one decimal place. The preset unit is mg/100mL. For example, enter 80.0 for 0.080% or enter 100.0 for a 0.100% solution. Note: Remember to use the High-Altitude Correction Chart to adjust for altitude if needed based on your elevation.
| Mg/100mL | % | % & g/L |
| 20.0 | 0.02 | 0.20 |
| 50.0 | 0.05 | 0.50 |
| 80.0 | 0.080 | 0.80 |
| 100.0 | 0.10 | 1.00 |
| 150.0 | 0.15 | 1.50 |
5. Select right arrow to confirm.
6. The next screen to appear is the calibration screen.
The first line shown is the concentration of the calibration solution/cylinder. The second line is the temperature (22 to 28 C). The third line is the calibrated value (to be tested).
7. Place a new mouthpiece on the Mercury and Connect the Mercury to the cylinder.
Note: Firmly press down on the mouthpiece to make sure the mouthpiece is securely attached to the Mercury.
8. Press the gas regulator button, allowing gas to flow into the mouthpiece for 8-10 seconds. While still pressing on the gas, press the Cal. button to acquire a sample. The gas MUST be flowing into the mouthpiece while the sample is taken. Once you hear the pump click, indicating the sample has been taken, you can release your finger from the gas and remove the device from the regulator.
9. A “Wait” screen will briefly flash and then the Calibration screen will display. The calibrated value in the third line will be changed (this value is a mixture of letters and numbers).
10. Select right arrow to confirm.
Note: The screen will not change but the calibration will be internally confirmed.
11. An Accuracy Check/Calibration Check should always be performed after a calibration to ensure the calibration was successful. For instructions on performing an accuracy check, please see the Accuracy Check tutorial
Alcovisor Jupiter Calibration for devices with 9 Home Screen Icons
1. Select the Settings Icon and select “Cal.”.
2. Enter the password. Please refer to the Advanced Settings manual for password.
3. Enter the concentration of the calibration solution/cylinder. Accuracy should be to one decimal place. The preset unit is mg/100mL. For example, enter 80.0 for 0.080% or enter 100.0 for a 0.100% solution. Note: Remember to use the High-Altitude Correction Chart to adjust for altitude if needed based on your elevation.
| Mg/100mL | % | % & g/L |
| 20.0 | 0.02 | 0.20 |
| 50.0 | 0.05 | 0.50 |
| 80.0 | 0.080 | 0.80 |
| 100.0 | 0.10 | 1.00 |
| 150.0 | 0.15 | 1.50 |
4. Select right arrow icon to confirm.
5. The next screen to appear is the calibration screen. The first line shown is the concentration of the calibration solution/cylinder. The second line is the temperature (22 to 28 C). The third line is the calibrated value (to be tested).
6. Place a new mouthpiece on the Jupiter and Connect the Jupiter to the cylinder. Note: Firmly press down on the mouthpiece to make sure the mouthpiece is securely attached to the Jupiter.
7. Press the gas regulator button, allowing gas to flow into the mouthpiece for 8-10 seconds. While still pressing on the gas, press the Cal. button to acquire a sample. The gas MUST be flowing into the mouthpiece while the sample is taken. Once you hear the pump click, indicating the sample has been taken, you can release your finger from the gas and remove the device from the regulator.
8. A “Wait” screen will briefly flash and then the calibration screen will display. The calibrated value in the third line will be changed (this value is a mixture of letters and numbers).
9. Select right arrow icon to confirm.
Note: The screen will not change but the calibration will be internally confirmed.
10. Return to the Main Menu and perform an accuracy check to verify the calibration results. For instructions on performing an accuracy check, please see the Accuracy Check tutorial
Alcovisor Jupiter Calibration for devices with 4 Home Screen Icons

(It is recommended to set your AUTO OFF timer to 10 minutes to complete Calibration
1. Select the Settings Icon and select “Cal.”.
2. Enter the password. Please refer to the Advanced Settings manual for password.
3. Select Dry Gas Calibration
4. Enter the concentration of the calibration solution/cylinder. Accuracy should be to one decimal place. The preset unit is mg/100mL. For example, enter 80.0 for 0.080% or enter 100.0 for a 0.100% solution. Note: Remember to use the High-Altitude Correction Chart to adjust for altitude if needed based on your elevation.
| Mg/100mL | % | % & g/L |
| 20.0 | 0.02 | 0.20 |
| 50.0 | 0.05 | 0.50 |
| 80.0 | 0.080 | 0.80 |
| 100.0 | 0.10 | 1.00 |
| 150.0 | 0.15 | 1.50 |
5. Select right arrow icon to confirm.
6. The next screen to appear is the calibration screen. The first line shown is the concentration of the calibration solution/cylinder. The second line is the temperature (22 to 28 C). The third line is the calibrated value (to be tested).

7. Place a new mouthpiece on the Jupiter and Connect the Jupiter to the cylinder. Note: Firmly press down on the mouthpiece to make sure the mouthpiece is securely attached to the Jupiter.regulator.
8. Press the gas regulator button, allowing gas to flow into the mouthpiece for 8-10 seconds. While still pressing on the gas, press the Cal. button to acquire a sample. The gas MUST be flowing into the mouthpiece while the sample is taken. Once you hear the pump click, indicating the sample has been taken, you can release your finger from the gas and remove the device from the regulator.
9. A “Wait” screen will briefly flash and then the Calibration Completed screen will display. The calibrated value in the third line will be changed (this value is a mixture of letters and numbers).
10. Select to confirm.
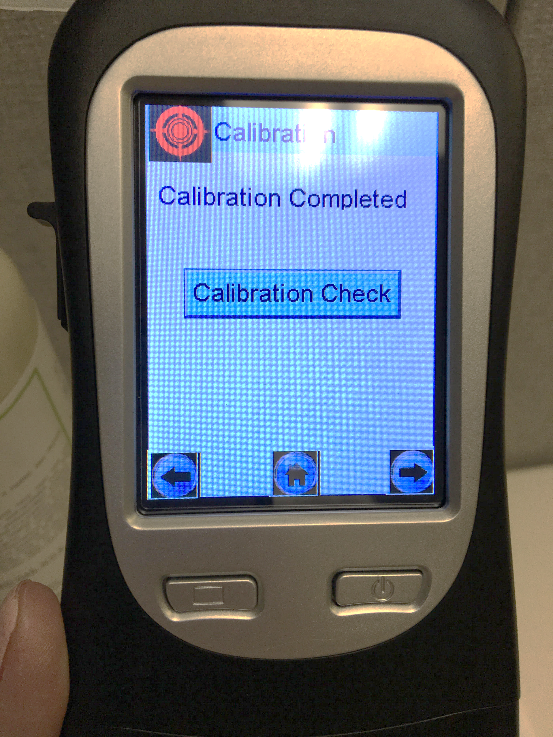
11. Wait 3-5 minutes and perform the Calibration Check. A Calibration Check must always be performed following the calibration to ensure successful calibration. You must do this step in order for Calibration data to be saved. For assistance with performing a calibration check, please see the Accuracy Check Tutorial.